Showing posts with label Cricut. Show all posts

Monday, October 31, 2011

Happy Halloween!!!

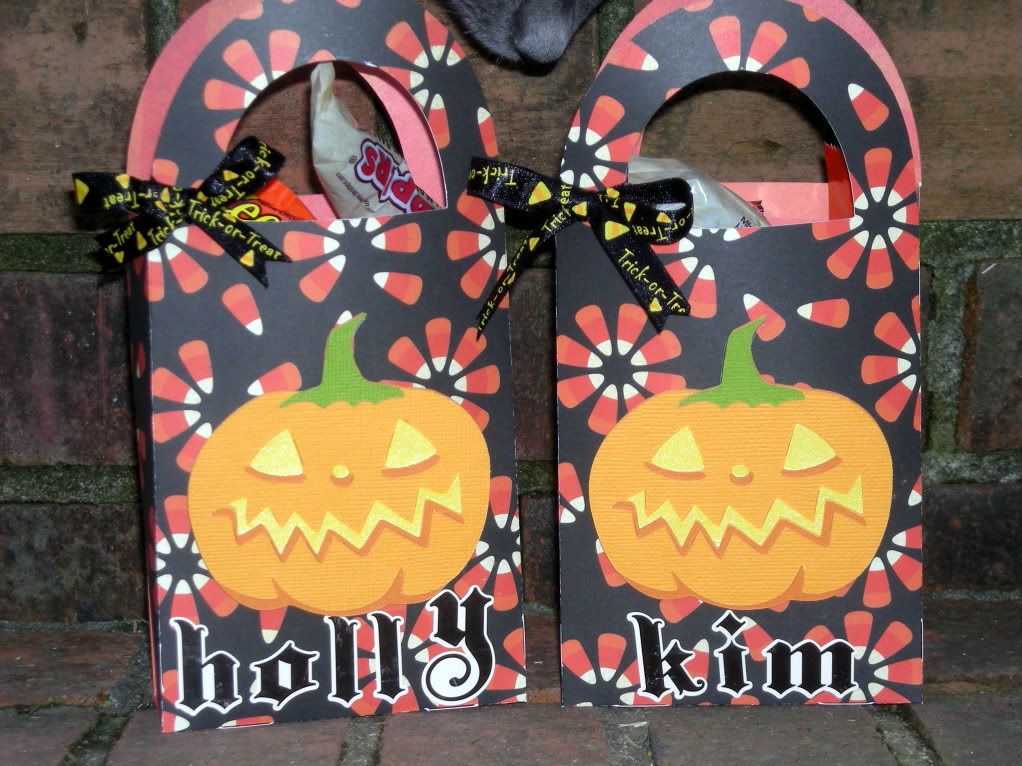
Hello friends! I hope you had a nice weekend! Did yours fly by as fast as mine? Always over too soon! I worked on a lot of laundry, nursed a sick hubby, and worked on some Trick or Treats for my girls at work and my nephews across the street. Oh, and last night we watched the movie Bridesmaids! Have you seen it? Such a cute and funny movie! I LOVED it! SO FUN! I didn't do a lot of Halloween cards and crafting this year, but since it's Halloween, I thought I'd share the treat bags I made for a couple of my close friends at work.

I used my cricut and the Wrap It Up cartridge to make the bags and Pumpkins on the front and some Echo Park stickers for their names. I did not get a picture of all the little boxes and containers I made for my nephews, I was so rushed. If I have any daylight left when I get home and before I deliver them tonight, I'll try and snap a pic. But, either way, I'll be back soon! Thanks so much for stopping by!

Have a Happy and Safe Halloween!

Wednesday, October 26, 2011

a birthday card

Hello and Happy Wednesday crafty peeps! We are over half way through the work week! Woohoo! Come On, Friday! In my October Papertrey Ink order, I threw the Sheet Music Background set in my cart as a last minute decision based on a Christmas card I saw from one of the Design Team members, so naturally I was itching to use it and had the perfect reason to! This past Saturday was my mother-in-law's birthday, and she loves the piano and plays for our church, so I dusted off my cricut, and finally made her the card I've been thinking of making her for a couple years now!
I had also just gotten the new Aqua Mist Ink, and since my mother-in-law loves blue's, it was the perfect choice for my main color! You can't really tell in the photo, but the paper I used for the piano, and as the Mat Stack 3 Layerz is a dark gray shimmer paper, which looks pretty nice in person. The little white music notes are brads I have had in my stash for the longest and I finally used them up on this card! I was pretty happy with how the card turned out, and even more importantly, my mother-in-law really loved it! :))) I have a couple more cards I need to share, so I'll be back soon! Thanks so much for stopping by!
***HUGS***

Wednesday, March 23, 2011

More catch up

So, I started making cards to sell at the jewelry store where my husband works. Since Valentine's Day is such a big holiday for a jewlery store, I made a lot of Valentine's cards. I shared a few yesterday, and here are a few more.

Okay, I think I'm done with Valentine's now! ;)
Thanks so much for stopping by!
Jess


Tuesday, March 22, 2011

playing catch up

It feels kind of silly posting Valentine's Day cards in March, but I never got around to posting them. Some of them can be used for other occasions too, though. So, here you go!
I have a few more, but I'll break it up a little a post those tomorrow.
Thanks so much for looking!
Jess

Wednesday, December 29, 2010

Here is a card I made the other day for my husband:
Here is a close up on the sentiment on the front, since it is hard to see..

And the inside:
Oops. I think it's a little crooked. :)

Supplies:
Stamps~Chair-ished, Papertrey Ink
Cardsock~Fine Linen, Papertrey Ink
Patterned Paper~ October Afternoon, I think it's the Thrift Shop collection.
Other~ ribbon, Papertrey Ink; Ink, Walnut Stain Distress Ink; Large Scallop die, Papertrey Ink

And before I go, I also wanted to quickly share some gift bags I made for Christmas...

I made these for my Mother-in-law and Sister-in-law to hold part of their gifts. I bought the pre-made Kraft gift bags at Michael's, and decorated them with patterned paper from Echo Park, Cricut die cuts, the cardstock, ribbon, and tags were Papertrey Ink. I also added a little stickles to the fires. And I finally remembered to use the jingle bells I bought! I meant to put them all over my cards, cause I thought they were so cute when I saw them on cards, but kept forgetting!

And here is one last picture for today:
For our 4 nephews we went the easy and lame route, gift cards! So, I quickly cut these gift bags on my Cricut using some ancient patterned paper from my stash, in an attempt to add some excitement to the gift cards. But, they are all boys, so they would've been just as happy if I had just handed them the gift card! ;)

Well, that is all for today! I am now off to start another 4 day weekend! I only had to work 2 days this week! How nice is that! This is how it should be, I say! I hope to have lots to share next week after a long weekend in my craft room!

I wish you all a wonderful and safe New Years!
{{{HUGS}}}
Jess


Thursday, June 17, 2010

Father's Day card

Since Father's Day ofter tries to steal my birthday's thunder, meaning many years they fall on the same day, I find it only fitting that I share with you the Father's Day card I made for my husband, on my birthday! I spent weeks trying to figure out a good Father's Day card to make for him. We have no children together (yet) but he has an 8 year old son who still lives in Florida. Anyway, I struggled with ideas for a card until I saw a card posted on the blog of a very talented woman. Her card uses the classic cars cut from the Heritage cartridge. I have this cart, and my husband love classic cars, so I knew I wanted to do something like this. A couple days later I came across a simple tutorial for the side step card, I'd wanted to try this type of card anyway, and I thought the two ideas would work well together...

It also gave me the chance to play with my new Martha Stewart Score Board, which I LOVE! The papers are K&Company Amy Butler, Lotus. I wish I'd had that sentiment in a stamp, but I can live with having to just write it in this time. I tell ya, it is hard toning down cards, and skipping over all the pretty papers to use the muted patterns, but you know this! :)
So, that's it for today, I'm off to stalk my mailman! Please, Gypsy, come today!
Have a great day! I'll save you some cake!
XOXO
Jess

Tuesday, June 15, 2010

Fly

I hope you're having a good week, so far! I am getting ready for a much needed 4 day weekend! WooHoo! It'll kick off on Thursday, which is my birthday! So, that works out really nice! For my birthday, I bought a gypsy! I bought it off ebay on Friday, and I'm just hoping that it makes it in time for my birthday! I will have a nice long weekend to play with, and get acquainted with my new best friend! ;)
I don't think I've mentioned, but my husband is a Jeweler. He has just gotten into designing and making some custom pieces. So, he has made me something for my birthday, and he's really bad about waiting to give gifts, so this one is really killing him! lol. I can totally relate though, cause he is the first person I show all my cards to, and over the weekend I made a Father's Day card for him, which I am still shocked I got it done a whole week early! lol. I can be so bad about waiting to the last minute! But, I've been dying to show it to him! Maybe that is why it's better if I wait until the last minute??
So, enough about me and my birthday, I am old enough that I should really care less, and even dread it by now. But, comon' who doesn't LOVE getting presents!?!? Even the ones we get ourselves!
I do have a fun and easy little card to share today. It's another one that I got the idea while reading a card magazine. I actually made it last weekend, but it sat on my desk for a week needing *something* in the top corner where I'd left room for a sentiment or *something*. I finally decided I needed to just do something to finish it, so I cut "Fly"...


The background is the technique I saw in the magazine. It is achieved by taking those adhesive tabs, and placing them in that checker board  pattern on a piece of cardstock. Then all you do is sprinkle your embossing powder on, and heat until melted with your heat tool! The dragonflies I cut on the Pagoda cartridge with my Cricut, and Viola! I hope you like it, and I'll be back soon to post a couple more cards I just haven't taken pictures of yet, including my husband's Father's Day card that I am really happy about, and at least I can show YOU now! lol. Have a great rest of the day, and thanks so much for stopping by and all the sweet and supportive comments that mean the world to me!
XOXO,
Jess

Friday, May 28, 2010

Card 'Lift'

Are you ready for the long Memorial Day weekend? I sure know I am! I have got a Scrappy-Shopping day planned for Memorial Day! You see, I live in a very small town that only has Wal-mart and Dollar General for shopping. The city I work is a little better with a Tuesday Mornings, but still not much else. So, my husband and I have a little day shopping trip planned, probably to Jackson, MS, which is a couple hours away, but there is a Target, Hobby Lobby, and a Michaels!!! I literally haven't been to these stores in well over a year! Isn't that sad!? And I'm sure you can imagine how excited I am! What's funny is that I saw some pictures on a blog recently that someone had posted of the Cricut Demonstrators at Michaels, and I saw a whole aisle of Cricut goodies! The last time I shopped at Michael's, they did not have a whole Cricut aisle, actually, I don't think they had much of anything Cricut, yet!
So, my husband has been really sick this week. They think he has Mono. He tested negative for it and strep, but his throat looks like he swallowed a soft ball, and his blood counts indicated he had something viral, so they're calling it Mono. So, yesterday I stopped in at my doctor's to get checked out, and as I was waiting, I was looking though a card magazine, and it was this card in this magazine in particular:

Well, I really liked this card, and I instantly thought of the paper in the DCWV Flower Shower, Spring Stack. So, I couldn't wait to get home last night to try and recreate it! Now, in the middle of the magazine, there is a tear-out pattern for all the elements on this card, but I found similar shapes on the Accent Essential's and Mother's Day cartridges, so decided it would be way easier to just use my trusty ole' Cricut. And this was what I came up with:

I inked the edges, as opposed to the sanding in the original. I added some stickles, and the sentiment is a stamp I've had in my stash that came out of a kit. I stamped it on cream cardstock, and spritzed it with a little pink home made shimmer spray. In the center of the flower is a Sweat Pea felt flower from Stampin' Up that I'd gotten a couple months ago as part of a blog candy I'd won from Sam over at Scrapmaster's Paradise. Actually, come to think of it, so was the ink I'd used to stamp the sentiment. She's a sweetie and has a great informative and inspirational blog, and is a Stampin' Up Demonstator.
Well, that's all I have for today! I hope you have a great holiday weekend! Thanks so much for taking the time to stop by my neck of the web!

Wednesday, January 6, 2010

My First Cricut Card

I had to share my first Cricut Card that I made my 8 year-old step-son for Christmas. I had attempted a few other cards within the month I'd had my Cricut previous to making this card, but I was never happy with the way they were turning out, so I'd move on and try something else. I'd had something totally different in mind when I'd started his card. After hours of cutting, and piecing my dozens of cuts on an assortment of papers, then trying to mix and match them in different ways with different backgrounds, nothing looked good together, and I was on the verge of giving up. Then, out of no where a vision of a card pops in my head, and although it was a completely different style card than I usually create, it was also the very reason it worked so well. It was just a plain, simple card.

My First Cricut Card:


 I don't have all the details and sizes at which I cut this, lesson learned, but it was all cut from the Joys of the Season cartridge. The base is cut using the card feature of the ornament shape. I just cut out the cute little penguin with his layers, and assembled! I love the look of dots or dashes or the combination of the two, so I completed the card by using a white paint marker to add the dotted border. Since making this card I've purchased a White Uniball Signo Gel Pen off ebay, after continuously reading all the raves and recommendations for this particular pen on many popular crafting blogs that I follow. I haven't used it on a project yet, but will definitely post my opinion once I do.